SpeedDrive documentation =
Project Moved To [Github](). Visit Github Repo For Latest Files And Updates. -
The motivation behind creating the [SpeedDrive]() mount was to extract maximum performance out of my ender3 with mostly stock parts. Print Fast with near-perfect quality. After pushing Bowden to its limit, I came to the conclusion (like many others), that sharp and accurate corners are simply impossible with a Bowden setup. Bowden setups are great for models with curvature, but for my particular uses, I was printing precisely engineered parts that often needed to fit together. Bowden setups produce poor corners because of imprecise linear/pressure advance due to play and friction inside the Bowden tube. This can be reduced to some extent, but never entirely eliminated.
I started playing around with various mount designs and found them to be inadequate. The corners were good, but ringing and vibration prevented high speed printing and good bed adhesion. The orientation of the motor and distance from the X extrusion was not suited for sufficient inertial dampening.
1. Orientation of the motor (shaft) should be perpendicular to the X extrusion for good absorption of rotational inertia.
2. The motors centre of mass should be as close as possible to the middle of the X extrusion for absorption of its significant linear inertia at speed.
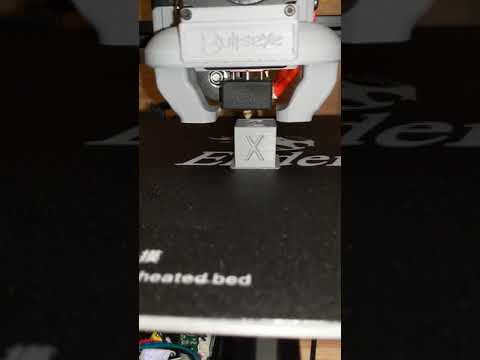
Staying true to the operating principles, my solution was to mount the motor from behind the carriage with the extruder facing forwards. Speeds upwards of 100mm/s and accelerations of 3000+ are not only possible, these are real operating speeds that I have been using day to day for all my prints (see image of [xyz cube]()). By no means is your printer guaranteed to get these results right off the bat, start at 1500accel and work up from there.
There are now several designs and remixes claiming to be an improvement over the original SpeedDrive. I am all for innovation, however many of these designs violate one or both of the operating principles inherent to the SpeedDrive design. For this reason, I would not recommend any design or remix not explicitly listed on this page. Remixes and improvements are welcome however I encourage designers to stay faithful to the design principles.
Important Note! -
The only downside to this solution is that the stock motor will slam into the frame unless the X endstop is adjusted. Therefore, I have also designed a 7.5mm endstop spacer that fits onto the carriage. This will shorten the bed in the X orientation by roughly 1cm on each side. In slicer, your Enders bed size should also be changed to 200mm in the X direction.
See the [remix by dascook](https://www.thingiverse.com/thing:3990436) for reclaiming lost X space if thats important to you (Bmg only, pancake stepper required).
Also, for very tall prints you will need to extend the e-motor cable and adjust the printers Z height in slicer to 200mm.
This is a demo of a near-perfect calibration cube printed in 13minutes using Klipper firmware and pressure advance (see [picture]()). When my ender was still Bowden, I could only manage a 15minute cube with acceptable results. I dont know what to make of this because in theory, the Bowden setup should get higher speeds but it appears that superior corner performance and placement of the SpeedDrive negates the weight disadvantage. This is actually not that surprising because Prusa printers are known to print at these speeds with similar quality.
[](http://www.youtube.com/watch?v=PnwfLujIF-U Video Title)
Print with the [flat part down](), at least 4 walls and 50% gyroid infill. Enable support roof. 0.2 should be fine. Pla is fine.
I recommend tightening the mount first without the v-wheel sleeves. This will set the middle hole and close that gap with the carriage.
The sleeves will be very tough to fit into the mount holes, but should eventually go in with enough force. This is by design because these are the only points holding the mount. One user reported easier installation by heating the sleeves with soldering iron prior to installation.
See comments section for more installation tips.
Also see this great video by [YouMakeTech](https://www.thingiverse.com/youmaketech/designs) https://www.youtube.com/embed/Zbk0viFC1ewquot; frameborder=0 allow=accelerometer; autoplay; clipboard-write; encrypted-media; gyroscope; picture-in-picture allowfullscreen
Stock 4010 Cooling at these speeds becomes an issue. Staying true to stock parts, my goal was to squeeze the most cooling performance out of the 4010 blower. I was was very disappointed with the Hero Me because I really liked the compact design. There are some who feel that its equal to the bullseye, but I have not seen tests at these kinds of speeds. I found the Hero Mes cooling to be too asymmetrical and lacking correct directionality due to the duct design. The designer of the hero me himself was reluctant to adapt his design to the 4010 cooler, and only did so as a user request.
The bullseye on the other hand provides adequate cooling, and Ive yet to see its limits. The only downside to the bullseye is that the orientation of the fan causes a bit of a rattle inside the sleeve bearing. A bit of lubrication can temporarily alleviate this but so far I have not found a permanent solution. Either way, I have seen no evidence that the rattle impacts print quality whatsoever.
I have included a slightly modified bullseye base for compatibility with SpeedDrive mount and endstop spacer. SpeedDrive is also fully compatible with the stock cooler.
Dual 5015 I really like the hero me dual fan design with the light-weight dual ducts (see image of my Bmg setup). I have also included a slightly modified hero me base for compatibility with the SpeedDrive. Dual 5015 fans will absolutely cause clogging if installed incorrectly. Make sure they are blowing on the print, not the nozzle.
Note Both herome and bullseye have a fairly flimsy mounting system for the ducts. I just epoxied the ducts to the base for improved fidelity.
Note: This section does not apply to Tmc drivers
There seems to be some debate over whether or not Tl smoothers are necessary on an ender3. I believe the source of this
Источник: https://www.thingiverse.com/thing:3990436
Автор: youmaketech
Лицензия: Creative Commons - Attribution
Другие модели автора
Все модели
Скачать SpeedDrive v1 — оригинальное крепление с прямым приводом — 3D-модель для печати на 3D-принтере
Скачать SpeedDrive v1 — оригинальное крепление с прямым приводом — 3D-модель для печати на 3D-принтере. Файл загружен автором Katalog3D на маркетплейс Каталог3Д и доступен для скачивания в формате STL или 3MF.
Лицензия. Перед использованием ознакомьтесь с условиями лицензии в карточке модели. Одни файлы разрешают только личную печать, другие — коммерческое использование. Подробнее — в разделе лицензии.
Смотрите также: другие модели этого автора, похожие файлы по тегам — Ender-3, direct drive.
